DB administration notes

AB user roles:

-AB user - regular user who can modify, add, filter, and search as needed

-AB programmer - creates functions and procedures (triggers)

- DBA - AB administrator - ensures that the right users have the right permissions

- AB designer - creates tables and the AB structure
DBA - AB administrator types:
*system administrator
*AB architect
*AB analyst
*Data warehouse administrator -  админ хранилище данных (admeladu)
The two main objectives (tasks) of the DBA:
1. User support and access sharing and configuration
2. Ensuring AB security and performance
AB security - 3 key aspects:
*data confidentiality
GRANT role to user [identified by pwd] [with grant option];
REVOKE role from user;

*data availability (availability) - доступность - data is available at the right time and to the right user
*data integrity (integrity) - целостность - reliable data sources
RiskSafety aspect
Human errorsconfidentiality, availability, integrity
physical defects (hardware)availability, integrity
operating system failuresavailability, integrity, confidentiality
database system failuresavailability, integrity, confidentiality
-COMMIT - The COMMIT command is used to save all changes made during the current transaction to the database. Once the transaction is committed, the changes become permanent. 

-ROLLBACK - If an error occurs, such as a query problem, you can use ROLLBACK to undo all changes made during the transaction.

-ROLLFORWARD - This command restores the database by applying the transactions stored in the database log files.

-Data mining - Discovering valuable patterns and insights from large data sets using machine learning, statistics, and database system methods.

-Data warehouse - a central repository of data integrated from various sources. These store current and historical data, organized in a way that is optimized for data analysis, reporting, and drawing conclusions based on integrated data.

GROUP BY - this statement groups rows with the same values into summary rows, for example, "find the number of customers in each country"

SELECT COUNT(CustomerID), Country
FROM Customers
GROUP BY Country;

UNION ALL - command combines the result sets of two or more SELECT statements (allows duplicate values)

SELECT City FROM Customers
UNION ALL
SELECT City FROM Suppliers
ORDER BY City;

GROUPING - Determines whether the column expression in the GROUP BY list is aggregated or not

SELECT SalesQuota, SUM(SalesYTD) 'TotalSalesYTD', GROUPING(SalesQuota) AS 'Grouping'
FROM Sales.SalesPerson
GROUP BY SalesQuota WITH ROLLUP;
GO

- ROLLUP - operator enhances the capabilities of the GROUP BY clause, allowing

GROUP BY - this clause groups rows with the same values into summary rows, for example, "find the number of customers in each country"

SELECT COUNT(CustomerID), Country
FROM Customers
GROUP BY Country;

UNION ALL - command combines the result sets of two or more SELECT statements (allows duplicate values)

SELECT City FROM Customers
UNION ALL
SELECT City FROM Suppliers
ORDER BY City;

GROUPING - Determines whether the column expression in the GROUP BY list is aggregated or not

SELECT SalesQuota, SUM(SalesYTD) 'TotalSalesYTD', GROUPING(SalesQuota) AS 'Grouping'
FROM Sales.SalesPerson
GROUP BY SalesQuota WITH ROLLUP;
GO

- ROLLUP - The operator enhances the capabilities of the GROUP BY clause by allowing the calculation of subtotals and totals for a set of columns.

select COALESCE(Department, 'Total') as Department SUM(Salary)
from Employee1
Group By ROLLUP (Department);

- CUBE - is an extension of the GROUP BY clause that allows you to generate all possible combinations of groups for specified columns, including subtotals and totals.

SELECT state, SUM(salary) AS salary
FROM salary_reports
GROUP BY CUBE(state)
ORDER BY state;

Difference between ROLLUP and CUBE - ROLLUP summarizes based on the hierarchy of columns used in the GROUP BY clause. CUBE groups by all combinations of values. / Rollup sums the hierarchically selected columns CUBE calculates the sums in each column/combination

Keys

PRIMARY KEY

PRIMARY KEY – is a column or group of columns in a table that uniquely identifies each row in the table. A primary key cannot be duplicated, which means that the same value cannot appear more than once in the table. A table cannot have more than one primary key.

In this example, StudID is the primary key:

Rules for defining the primary key:

  • No two rows may have the same primary key value.
  • Each row must have a primary key value.
  • The primary key field must not be empty.
  • The value of the primary key column must never be changed or updated if any foreign key references that primary key.

ALTERNATE KEY

ALTERNATE KEY – is a column or group of columns in a table that uniquely identifies each row in the table. A table can have multiple primary key options, but only one can be designated as the primary key. All keys that are not primary keys are called alternate keys.

In this table, StudID, Roll No, and Email are qualified as primary keys. Since StudID is the primary key, Roll No and Email become alternate keys.

CANDIDATE KEY

CANDIDATE KEY in SQL – is a set of attributes that uniquely identifies tuples in a table. A candidate key is a superkey that has no duplicate attributes. The primary key should be selected from among the candidate keys. Each table must have at least one candidate key. A table can have multiple candidate keys, but only one primary key.

Candidate key properties:

  • It must contain unique values.
  • In SQL, a candidate key can have multiple attributes.
  • It must not contain null values.
  • It should contain the minimum number of fields to ensure uniqueness.
  • It must uniquely identify each record in the table.

Candidate key Example: In this table, Stud ID, registration number, and e-mail are candidate keys that help us uniquely identify student data in the table.

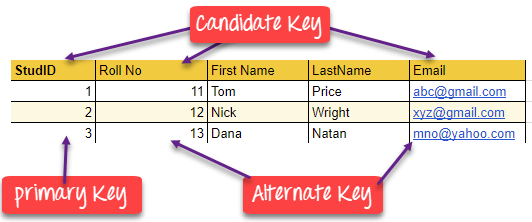
(this picture is a good example)

FOREIGN KEY

FOREIGN KEY – is a column that creates a relationship between two tables. The purpose of a foreign key is to maintain data integrity and enable navigation between two different entities. It acts as a cross-reference between two tables, as it refers to the primary key of the other table.

Example:

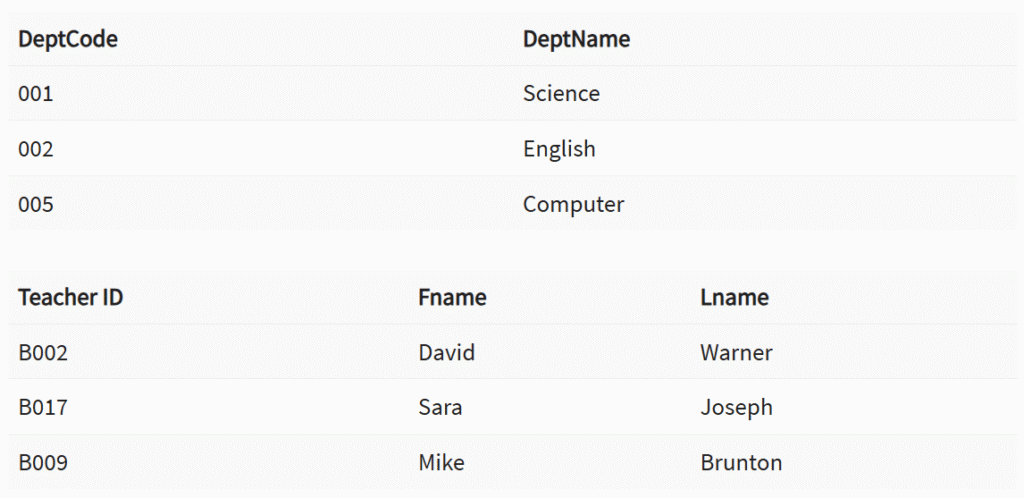
In this DBMS example, we have two tables: teachers and departments in a school. However, it is not possible to see which search works in which department.

In this table, we can add a foreign key Deptcode to the teacher’s name and create a link between the two tables.

This concept is also known as reference integrity.

COMPOUND KEY

COMPOUND KEY – consists of two or more attributes that allow you to uniquely identify a specific record. It is possible that each column is not unique in the database by itself. However, when combined with another column or columns, the combination of composite keys becomes unique. The purpose of a composite key in a database is to uniquely identify each record in a table.

Example:

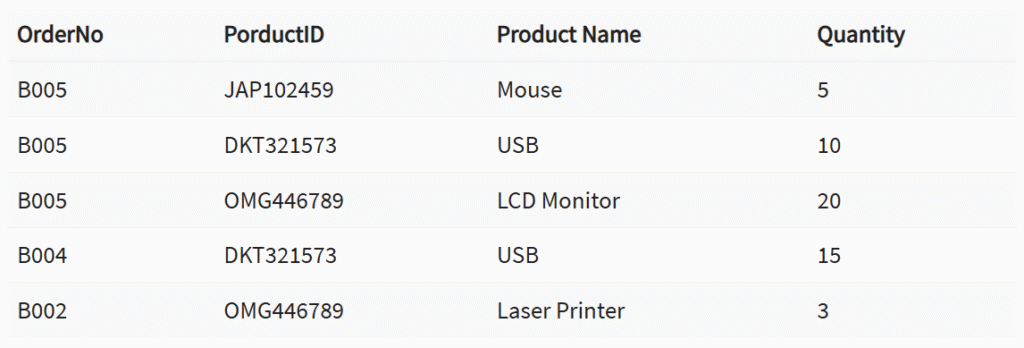
In this example, OrderNo and ProductID cannot be the primary key because they do not uniquely identify the record. However, a composite key of Order ID and Product ID could be used because it uniquely identifies each record.
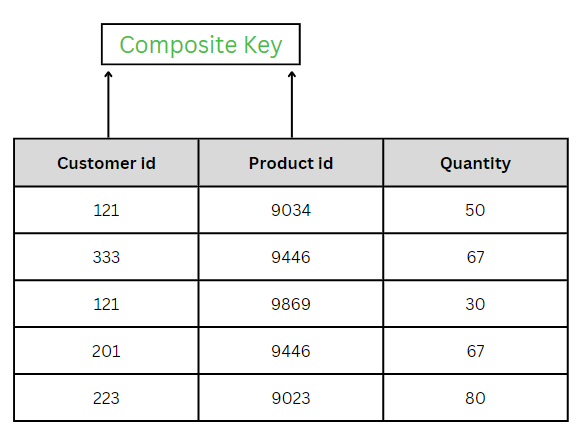
COMPOSITE KEY

COMPOSITE KEY – is a combination of two or more columns that uniquely identifies rows in a table. The combination of columns ensures uniqueness, although individual uniqueness is not guaranteed. Therefore, they are combined to uniquely identify records in a table.

The difference between a composite key and a composite key is that any part of a composite key can be a foreign key, but a composite key may or may not be part of a foreign key.
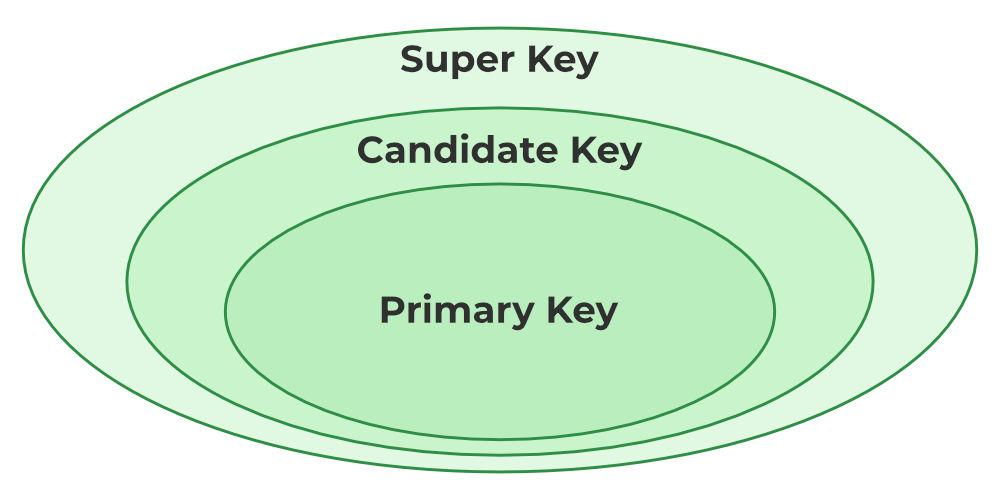
SUPER KEY

SUPER KEY – A set of one or more attributes (columns) that uniquely identifies a record is known as a superkey. It may contain additional attributes that are not essential for uniqueness but still uniquely identify the row. For example, STUD_NO, (STUD_NO, STUD_NAME), etc.

  • A superkey is a group of one or more keys that identifies the uniqueness of rows in a table. It supports NULL values in rows.
  • A superkey may contain additional attributes that are not necessary to ensure uniqueness.
  • For example, if the column “STUD_NO” can uniquely identify a student, adding “SNAME” to it still forms a valid superkey, even though it is not necessary.

Example: See the STUDENT table.

The superkey could be a combination of STUD_NO and PHONE, as this combination uniquely identifies the student.

UNIQUE KEY

UNIQUE KEY – ensures that all values in a column or group of columns are unique throughout the entire table. In addition, if a unique key is applied to multiple columns at once, every combination of values in those columns must be unique throughout the entire table.

Another feature of unique keys is that, unlike primary keys, they can contain NULL values, which can be unique. However, duplicate non-null values are not allowed.

Let’s look at a table called Student, using the desc command to display the column with a unique key:

desc Student;
+-----------------+-------------+------+-----+---------+-------+
| Field | Type | Null | Key | Default | Extra |
+-----------------+-------------+------+-----+---------+-------+
| id | int(11) | YES | UNI | NULL | |
| name | varchar(60) | YES | | NULL | |
| national_id | bigint(20) | NO | | NULL | |
| birth_date | date | YES | | NULL | |
| enrollment_date | date | YES | | NULL | |
| graduation_date | date | YES | | NULL | |
+-----------------+-------------+------+-----+---------+-------+

Here, the column id is marked with the UNI key, which indicates that it is a unique key. In addition, we see the YES mark under the Null column, which means that the id column may contain NULL values.

SIMPLE KEY

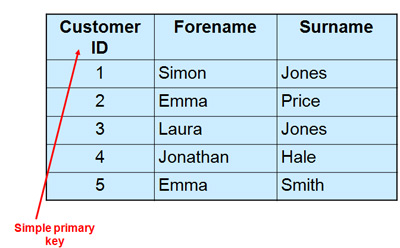
SIMPLE KEY – is a single attribute or column that uniquely identifies each row or record in a table. For example, a student ID can be a simple key in a student table, as no two students can have the same ID. A simple key is also called a primary key and usually has some restrictions, such as not allowing null values or duplicate values. A simple key can also be referenced by other tables as a foreign key to create a relationship between them.

Links

Syntax and structure of objects

How does JavaScript work with this?

JavaScript objects are powerful data structures that allow you to organize related data into a single unit. Objects consist of key-value pairs, where the key is a string and the value can be any JavaScript data type (number, string, array, function, etc.). Objects provide an excellent way to structure and manipulate data. We encounter objects in many ways in our daily lives. Here are some examples of where objects can be found:

  1. E-commerce – Online stores use objects to represent products, which have properties such as name, price, stock status, description, category, etc.
  2. Hotel reservations – Hotels use objects to represent reservations, where each reservation object may contain data such as customer name, dates, room type, price calculations, etc.
  3. Cars – Each car can be an object with different attributes such as make, model, color, engine size, registration number, etc.
  4. Students – Each student could be an object with properties nagu nimi, vanus, klass, hinded, osalemised, tegevused jne.

In JavaScript programs, it is possible to create custom objects as needed, as well as use built-in objects provided by JavaScript itself. Some built-in objects are, for example:

  1. The Math object contains mathematical functions and constants. It is often used to perform mathematical calculations such as rounding, square root, trigonometric functions, etc.
  2. The Date object allows you to work with dates and times. It can be used to create new date objects, access date components (such as day, month, year), and perform various operations between dates.
  3. The Array object is a built-in object used to create and manipulate arrays. It contains several methods that allow you to work with arrays, such as adding, removing, sorting, filtering, etc.
  4. The String object contains methods that allow you to work with strings. For example, you can use methods such as length (to get the length), toUpperCase (to use uppercase letters), substring (to get a substring), etc.
  5. The Object object is the base object in JavaScript that is used as the basis for all objects. Its methods can be used to create objects, add and access properties, copy objects, etc.

Creating an object

The syntax of an object consists of key-value pairs, where the key is a string and the value can be any JavaScript data type. In this example, an object named “car” has been created with the following properties:

The syntax of an object consists of key-value pairs, where the key is a string and the value can be any JavaScript data type. In this example, an object named “car” has been created with the following properties:

let auto = {
mark: "Toyota",
mudel: "Corolla",
aasta: 2022,
varv: "punane",
lisavarustus: ["kliimaseade", "elektriaknad", "navigatsioonisüsteem"]
};
// calling
console.log(auto);

To print, print the entire object:

console.log(auto.mark); // Output: "Toyota"
console.log(auto.mudel); // Output: "Corolla"
console.log(auto.aasta); // Output: 2022
console.log(auto.varv); // Output: "punane"
console.log(auto.omadused); // Output: ["kliimaseade", "elektriaknad", "navigatsioonisüsteem"]

Object methods and using this

Objects in JavaScript can contain not only properties, but also methods. Methods are functions of an object that can manipulate the object’s properties or perform other operations in the context of the object. The this keyword is used within methods to refer to the object in which the method is called. Let’s create a method for the previous car object that displays the car’s full name. In order for the method to use the properties of the same object, we must use the this keyword.

let autoOM = {
    //omadused
    mark: "Toyota",
    mudel: "Corolla L",
    aasta: 2022,
    varv: "punane",
    omadused: ["kliimaseade", "elektriaknad", "navigatsioonisüsteem"],

    //meetodid
    taisnimi: function() {
        return this.mark + " " + this.mudel;
    }
};

console.log(autoOM.taisnimi());

Method shortening

The new JavaScript ES6 now allows methods to be written in a shorter form.

//meetodid
  taisnimi() {
    return this.mark + " " + this.mudel;
  }

If the properties are in an array, use a for or forEach loop.

let auto = {
  //omadused
  mark: "Toyota",
  mudel: "Corolla L",
  aasta: 2022,
  varv: "punane",
  omadused: ["kliimaseade", "elektriaknad", "navigatsioonisüsteem"],

  //meetodid
  taisnimi() {
    return this.mark + " " + this.mudel;
  },

  kuvaOmadused() {
    this.omadused.forEach(omadus => console.log(omadus));  
  }
};

auto.kuvaOmadused();

Object arrays

An object array is a data structure in JavaScript that consists of several objects arranged in order based on an index. Each object is a collection of key-value pairs, where the key is unique and the value is the data of the key-value pair. An object array can contain various data types, including text (string), numbers, boolean values, functions, other objects, etc.

Creating and displaying an array of objects

Creating an array of objects is relatively simple. Let’s start by storing car data, for example. Each car is represented as an object that contains information about the car’s make, model, and year of manufacture.

let autod = [
  { mark: 'Toyota', mudel: 'Corolla', aasta: 2007 },
  { mark: 'Honda', mudel: 'Civic', aasta: 2012 },
  { mark: 'Tesla', mudel: 'Model 3', aasta: 2019 }
];

console.log(autod);

If we want to see the data for a specific car, we can refer to the car’s position in the array (remember that array indexing starts at 0)

console.log(autod[0]);

And in this object, I can access the elements using “dot syntax,” as above.

console.log(autod[0].mark);

To view all models, we again use the forEach loop

let autod = [
  { mark: 'Toyota', mudel: 'Corolla', aasta: 2007 },
  { mark: 'Honda', mudel: 'Civic', aasta: 2012 },
  { mark: 'Tesla', mudel: 'Model 3', aasta: 2019 }
];


autod.forEach((auto) => {
  console.log(`
    Mark: ${auto.mark},
    Mudel: ${auto.mudel},
    Aasta: ${auto.aasta}
    `);
});

Object array methods

JavaScript array methods can be used with both regular arrays and object arrays. Methods such as push(), pop(), shift(), unshift(), splice(), slice(), forEach(), map(), filter(), reduce(), sort(), etc. can all be used regardless of whether the array contains simple data types (such as strings or numbers) or more complex data (such as objects or even other arrays).

This is because arrays are objects in JavaScript, and both simple data types and objects are stored in arrays in the same way. The type of data contained in an array does not affect array methods. For example, adding new objects to an array of objects using push and unshift.

let autod = [
    { mark: 'Toyota', mudel: 'Corolla', aasta: 2007 },
    { mark: 'Honda', mudel: 'Civic', aasta: 2012 },
    { mark: 'Tesla', mudel: 'Model 3', aasta: 2019 },
    { mark: 'BMW', mudel: '320i', aasta: 2015 },
    { mark: 'Ford', mudel: 'Focus', aasta: 2020 }
];

//Lisab uue objekti massiivi lõppu
autod.push({ mark: 'BMW', mudel: '320i', aasta: 2015 });
autod.unshift({ mark: 'Ford', mudel: 'Focus', aasta: 2020 });

The splice method simultaneously deletes and adds.

massiiv.splice(
  {start indeks},
  {mitu eemaldada},
  {mida lisada}
);

For example

//Eemaldab esimese objekti
autod.splice(0,1);
//Lisab objekti alates teisest indeksist, ei kustutata midagi
autod.splice(1,0,{ mark: 'Audi', mudel: 'A4', aasta: 2018 });

Searching in an array

To search in an array of objects, we use the find method, which requires a function to be executed. We use the arrow function because it is shorter.

//Otsimine
let otsing = autod.find(auto=>auto.aasta > 2018);
console.log(otsing);

This method finds the first match and returns it. If no match is found, undefined is returned. To set multiple conditions, use the && operator.

//Otsimine
let otsing = autod.find(auto=>auto.aasta > 2018 && auto.mark === "Tesla");
console.log(otsing);

Since find only finds one result, use the filter method to get multiple answers. The filter creates a new array from the array and outputs the elements that match the conditions.

For example, we have numbers and want to get even numbers from them

let arvud = [1, 2, 3, 4, 5, 6, 7, 8, 9, 10];

const filtreeritud = arvud.filter(arv => arv % 2 === 0);
console.log(filtreeritud);

In the case of cars, we can turn to auto.aasta, for example, and filter those that are newer than 2018.

//Filtreerimine
let filter = autod.filter(auto=>auto.aasta > 2018);
console.log(filter);

Sorting an array

As a final method, let’s look at sorting. Simple sorting does not work correctly for arrays of objects. Therefore, we need to use a comparison function.

autod.sort((a, b) => a.aasta - b.aasta);
console.log(autod);

Here, (a, b) => a – b is a comparison function that tells sort() to sort numbers by their actual numerical values rather than their string values. The function a – b returns a negative value if a is less than b, a positive value if a is greater than b, and 0 if a and b are equal – exactly what sort() needs to sort its elements correctly.

Task

Book object

Create a book object with at least three properties: title, author, year.

let raamat = { 
  pealkiri: 'kuritegu ja karistus', 
  autor: 'Fyodor Dostoevsky', 
  aasta: 1866
};

2. Add a method that displays the description of the first book.

console.log(raamat.pealkiri);

Answer:

3. Add a method that changes the year of publication and prints the results to the console.

crime and punishment amended in 2020

let raamat = { 
  pealkiri: 'Kuritegu ja karistus', 
  autor: 'Fyodor Dostoevsky', 
  aasta: 1866
};

raamat.muudaAasta = function() {
  this.aasta = 2020;
  console.log(this.aasta);
};

raamat.muudaAasta();

Library

Create an object library with books as its properties (an array of books).

let raamatukogu = [
  { pealkiri: 'läänerindel on kõik vaikne', autor: 'Erih Remark', aasta: 1928},
  { pealkiri: 'Sipsik', autor: 'Eno Raud', aasta: 1962},
  { pealkiri: 'Jevgeni Onegin', autor: 'Aleksandr Pushkin', aasta: 1833}
];

2. Add a method that displays all books nicely in the console.

raamatukogu.forEach((raamatud) => {
  console.log(`
    Pealkiri: ${raamatud.pealkiri},
    Autor: ${raamatud.autor},
    Aasta: ${raamatud.aasta}
    `);
});

3. Add a method that adds a new book.

raamatukogu.push({ pealkiri: 'midagi', autor: 'keegi', aasta: 2025 });

4. Add a method that displays the total number of books in the library.

console.log(raamatukogu.length)

5. Add a method that calculates how many books have been published since 2000.

let filter = raamatukogu.filter(raamatukogu=>raamatukogu.aasta > 2000);
console.log(filter.length);

6. Develop your own method and write down what it means.

raamatukogu.forEach((raamatud) => {
  console.log(`
    Pealkiri: ${raamatud.pealkiri + " - " + raamatud.autor},
    Aasta: ${raamatud.aasta}
    `);
});
Raamatute andmed

Raamatute andmed

How it looks in webstorm

And this is the link to the work:

https://khusseintakhmazov24.thkit.ee/HTMLtood/ramatukogu/ramatukogu.html

AB haldus konspekt

AB kasutajate rollid:

-AB kasutaja - tavakasutaja, mis saab muuta, lisada, filtreerida ja otsida vastavalt vajadusele

-AB programmerija -loob funktsioonid protseduurid (trigerid)

- DBA - AB administratoor - tagab, et õiged kasutajad saavad oma õigused

- AB projekteerija - loob tabeleid ja AB struktuuri
DBA -AB administratoor liigid:
*süsteemiadmin
*AB arhitekt
*AB analüütik
*Data warehouse admin -  админ хранилище данных (admeladu)
DBA kaks peamist eesmärki (ülesanded):
1. kasutajate toetus ja ligipääsu jagamine ja seadistamine
2. AB turvalisus ja jõudluse tagamine
AB turvalisus - 3 põhiaspekti:
*andmete konfidentsiaalsus (confidentiality)
GRANT role to user [identified by pwd] [with grant option];
REVOKE role from user;

*andmete kättesaadavus (availability)- доступность - andmed me samme kätte õigel ajal ja õigel kasutajal
*andmete terviklikkus(integrity) - целостность - usaldusväärne andmeallikad
RiskOhutuse aspekt
Inimlikud veadkonfidentsiaalsus, kättesaadavus, terviklikkus
füüsilised vead (riistvara – hardware)kättesaadavus, terviklikkus
operatsioonisüsteemi rikkedkättesaadavus, terviklikkus, konfidentsiaalsus
andmebaasisüsteemi rikkedkättesaadavus, terviklikkus, konfidentsiaalsus
-COMMIT -COMMIT-käsku kasutatakse kõigi praeguse tehingu käigus tehtud muudatuste salvestamiseks andmebaasi. Kui tehing on kinnitatud, muutuvad muudatused püsivaks. 

-ROLLBACK - Kui tekib viga, näiteks päringu probleem, saate ROLLBACK-i abil tühistada kõik tehingu käigus tehtud muudatused

-ROLLFORWARD - käsk taastab andmebaasi, rakendades andmebaasi logifailidesse salvestatud tehinguid.

-Data mining - väärtuslike mustrite ja järelduste avastamine suurte andmekogumite põhjal, kasutades masinõppe, statistika ja andmebaasisüsteemide meetodeid.

-Data warehouse - on erinevatest allikatest integreeritud andmete keskne hoidla. Need hoiavad praeguseid ja varasemaid andmeid, mis on organiseeritud viisil, mis on optimeeritud andmete analüüsimiseks, aruannete koostamiseks ja integreeritud andmete põhjal järelduste tegemiseks.

GROUP BY - lause rühmitab samade väärtustega read kokkuvõtete ridadeks, näiteks „leia klientide arv igas riigis”

SELECT COUNT(CustomerID), Country
FROM Customers
GROUP BY Country;

UNION ALL - käsk ühendab kahe või enama SELECT-lause tulemusjoukonna (lubab dubleeritud väärtusi)

SELECT City FROM Customers
UNION ALL
SELECT City FROM Suppliers
ORDER BY City;

GROUPING - Määrab, kas GROUP BY loendis olev veeruavaldis on agregeeritud või mitte

SELECT SalesQuota, SUM(SalesYTD) 'TotalSalesYTD', GROUPING(SalesQuota) AS 'Grouping'
FROM Sales.SalesPerson
GROUP BY SalesQuota WITH ROLLUP;
GO

- ROLLUP - operaator täiustab GROUP BY-klausli võimekust, võimaldades arvutada veergude kogumi vahe- ja kogusummasid.

select COALESCE(Department, 'Total') as Department SUM(Salary)
from Employee1
Group By ROLLUP (Department);

- CUBE - on GROUP BY-klausli laiendus, mis võimaldab genereerida kõik võimalikud rühmade kombinatsioonid määratud veergude jaoks, sealhulgas vahesummad ja kogusumma.

SELECT state, SUM(salary) AS salary
FROM salary_reports
GROUP BY CUBE(state)
ORDER BY state;

Erunevus ROLLUP and CUBE - ROLLUP teeb kokkuvõtte GROUP BY-klauslis kasutatud veergude hierarhia alusel. CUBE rühmitab kõikide väärtuste kombinatsioonide järgi. / Rollup summerib hierarhiliselt valitud veergud CUBE, arvatub summad igas veerus/kombinatrsioonis

Guide and online calculator

JS piltidega töö

Random pilti näitamine


Vastus:
Summa:

Veebikalkulator: emojikon


aeg

#ligma button { background-color: purple; border: none; color: white; padding: 8px 14px; margin: 6px 4px 14px 0; border-radius: 6px; cursor: pointer; font-size: 15px; } #ligma button:hover { background-color: HotPink; } function naitaKuupaevaJaKellaega() { const now = new Date(); const kuupaev = now.toLocaleDateString(); const kellaaeg = now.toLocaleTimeString(); const kokku = now.toLocaleString(); document.getElementById(“kuupaev”).innerText = “Kuupäev: ” + kuupaev; document.getElementById(“kellaaeg”).innerText = “Kellaaeg: ” + kellaaeg; document.getElementById(“kokku”).innerText = “Kuupäev ja kellaaeg: ” + kokku; console.log(“Kuupäev:” + kuupaev); console.log(“Kellaaeg:” + kellaaeg); console.log(“Kuupäev ja kellaaeg:” + kokku); } function arvutaSynnipaevani() { const tana = new Date(); const synniP = new Date(tana.getFullYear(), 2, 14); if (synniP < tana) { synniP.setFullYear(tana.getFullYear() + 1); } const vaheMs = synniP – tana; const paevad = Math.ceil(vaheMs / (1000 * 60 * 60 * 24)); document.getElementById("vahe").innerText = "Minu sünnipäevani on jäänud: " + paevad + " päeva."; document.getElementById("teade").innerText = "Minu sünnipäeva kuupäev on: 14.02" console.log("Minu sünnipäevani on:" + paevad + "päeva"); }

Music

Muusikaküsimustik

Muusikaküsimustik

Milliseid muusikuid/bände sa tead?


Mida arvad muusika kuulamisest koolis?
Kui mitu tundi päevas sa muusikat kuulad?
Kas sa kuulad raadiot?
Milliseid raadiojaamu sa tead?
Millist muusikat sa kõige rohkem kuulad?


AB haldus konspekt

AB kasutajate rollid:

-AB kasutaja - tavakasutaja, mis saab muuta, lisada, filtreerida ja otsida vastavalt vajadusele

-AB programmerija -loob funktsioonid protseduurid (trigerid)

- DBA - AB administratoor - tagab, et õiged kasutajad saavad oma õigused

- AB projekteerija - loob tabeleid ja AB struktuuri
DBA -AB administratoor liigid:
*süsteemiadmin
*AB arhitekt
*AB analüütik
*Data warehouse admin -  админ хранилище данных (admeladu)
DBA kaks peamist eesmärki (ülesanded):
1. kasutajate toetus ja ligipääsu jagamine ja seadistamine
2. AB turvalisus ja jõudluse tagamine
AB turvalisus - 3 põhiaspekti:
*andmete konfidentsiaalsus (confidentiality)
GRANT role to user [identified by pwd] [with grant option];
REVOKE role from user;

*andmete kättesaadavus (availability)- доступность - andmed me samme kätte õigel ajal ja õigel kasutajal
*andmete terviklikkus(integrity) - целостность - usaldusväärne andmeallikad
RiskOhutuse aspekt
Inimlikud veadkonfidentsiaalsus, kättesaadavus, terviklikkus
füüsilised vead (riistvara – hardware)kättesaadavus, terviklikkus
operatsioonisüsteemi rikkedkättesaadavus, terviklikkus, konfidentsiaalsus
andmebaasisüsteemi rikkedkättesaadavus, terviklikkus, konfidentsiaalsus
- COMMIT - tähendab, et praeguses tehingus tehtud muudatused muutuvad püsivaks ja muutuvad nähtavaks teistele sessioonidele - означает, что изменения, внесенные в текущей транзакции, становятся постоянными и видны другим сеансам

- ROLLBACK - tühistab kõik praeguse tehinguga tehtud muudatused - отменяет все изменения, внесенные текущей транзакцией

- ROLLFORWARD - taastab andmebaasi, rakendades andmebaasi logifailidesse salvestatud tehinguid - восстанавливает базу данных путем применения транзакций, которые записаны в файлах журнала базы данных

- Data Mining – поиск скрытых шаблонов – on protsess, mille käigus ekstraktitakse ja leitakse mustreid suurtest andmekogumitest, kasutades selleks masinõppe, statistika ja andmebaasisüsteemide ristumiskohas olevaid meetodeid - это процесс извлечения и поиска закономерностей в огромных массивах данных с использованием методов, лежащих на стыке машинного обучения, статистики и систем баз данных

- Data Warehouse – Хранилище данных - on tsentraliseeritud andmehoidla, mis salvestab struktureeritud andmeid - является централизованным хранилищем, в котором хранятся структурированные данные

RBG teooria

Selles näites näete, et LED valgustus (antud olukorras punane) süttib sertan korda. Seda saab kasutada erinevate mustrite loomiseks, täpselt nagu koodis morse!

void setup()

{

  // pinMode() määrab töörežim

  pinMode(13, OUTPUT);   // 13-pini number, INPUT/OUTPUT(Sisend/Väljund).

}

void loop()

{

  digitalWrite(13, HIGH);   // Lülita sisse

  delay(1000);              // Ootab 1 sek  

  digitalWrite(13, LOW);    // Lülita välja

  delay(3000);              // Ootab 3 sek


  digitalWrite(13, HIGH);   // -... .- .-.. .-.. ...

  delay(3000);               

  digitalWrite(13, LOW);

  delay(1000);
  
  digitalWrite(13, HIGH);
  
  delay(1000);
  
  digitalWrite(13, LOW);

  delay(1000);
  
  digitalWrite(13, HIGH);
  
  delay(1000);
  
  digitalWrite(13, LOW);

  delay(1000);
  
  digitalWrite(13, HIGH);
  
  delay(1000);
  
  digitalWrite(13, LOW);

  delay(1000);
  
  digitalWrite(13, HIGH);
  
  delay(1000);
  
  digitalWrite(13, LOW);

  delay(1000);
  
  digitalWrite(13, HIGH);

  delay(3000);
  
  digitalWrite(13, LOW);

  delay(1000);
  
  digitalWrite(13, HIGH);

  delay(1000);
  
  digitalWrite(13, LOW);

  delay(1000);
  
  digitalWrite(13, HIGH);

  delay(3000);
  
  digitalWrite(13, LOW);

  delay(1000);
  
  digitalWrite(13, HIGH);

  delay(1000);
  
  digitalWrite(13, LOW);

  delay(1000);
  
  digitalWrite(13, HIGH);

  delay(1000);
  
  digitalWrite(13, LOW);

  delay(1000);
  
  digitalWrite(13, HIGH);

  delay(1000);
  
  digitalWrite(13, LOW);

  delay(1000);
  
  digitalWrite(13, HIGH);

  delay(3000);
  
  digitalWrite(13, LOW);

  delay(1000);
  
  digitalWrite(13, HIGH);

  delay(1000);
  
  digitalWrite(13, LOW);

  delay(1000);
  
  digitalWrite(13, HIGH);

  delay(3000);
  
  digitalWrite(13, LOW);

  delay(1000);
  
  digitalWrite(13, HIGH);

  delay(3000);
  
  digitalWrite(13, LOW);

  delay(1000);
  
  digitalWrite(13, HIGH);

  delay(3000);
  
  digitalWrite(13, LOW);

  delay(1000);
  
  digitalWrite(13, HIGH);

  delay(3000);
  
  digitalWrite(13, LOW);

  delay(1000);


  digitalWrite(13, HIGH);   // -... .- .-.. .-.. ...

  delay(1000);              // Ootab 1 sek  

  digitalWrite(13, LOW);    // Lülita välja

  delay(3000);
}

Sellel pildil on emaplaat, mis on saanud koodi, mis annab edasi leivaplaadi ja RGB-lambi.

Seal on transistorid mille vältida liiga palju võimu läheb lamp, sest me ei taha, et kogu asi põlema minna.

Kasutan Arduino, laendusplaat, juhtmed, 3 transistoridit (220 om) ja 1 RGB lamp

kood:

const int RED_PIN = 11;

const int GREEN_PIN = 9;

const int BLUE_PIN = 10;

int DISPLAY_TIME = 100;  // värvimuutuse kiirus

void setup()

{

  pinMode(RED_PIN, OUTPUT);

  pinMode(GREEN_PIN, OUTPUT);

  pinMode(BLUE_PIN, OUTPUT);

}

void loop()

{

mainColors();

showSpectrum();

}

void mainColors()

{

// Kõik LEDid on välja lülitatud

  digitalWrite(RED_PIN, LOW);

  digitalWrite(GREEN_PIN, LOW);

  digitalWrite(BLUE_PIN, LOW);

 delay(1000);

//Põleb punane

  digitalWrite(RED_PIN, HIGH);

  digitalWrite(GREEN_PIN, LOW);

  digitalWrite(BLUE_PIN, LOW);

  delay(1000);

// Põleb roheline

  digitalWrite(RED_PIN, LOW);

  digitalWrite(GREEN_PIN, HIGH);

  digitalWrite(BLUE_PIN, LOW);

  delay(1000);

// Sinine on sisse lülitatud

  digitalWrite(RED_PIN, LOW);

  digitalWrite(GREEN_PIN, LOW);

  digitalWrite(BLUE_PIN, HIGH);

  delay(1000);

// Kollane.

  digitalWrite(RED_PIN, HIGH);

  digitalWrite(GREEN_PIN, HIGH);

  digitalWrite(BLUE_PIN, LOW);

  delay(1000);

// Lilla

  digitalWrite(RED_PIN, LOW);

  digitalWrite(GREEN_PIN, HIGH);

  digitalWrite(BLUE_PIN, HIGH);

  delay(1000);

//Roosa

  digitalWrite(RED_PIN, HIGH);

  digitalWrite(GREEN_PIN, LOW);

  digitalWrite(BLUE_PIN, HIGH);

  delay(1000);

//Valge ehk kõik on sisse lülitatud

  digitalWrite(RED_PIN, HIGH);

  digitalWrite(GREEN_PIN, HIGH);

  digitalWrite(BLUE_PIN, HIGH);

  delay(1000);

}

// Vikerkaar. 

void showSpectrum()

{

  int x;

  for (x = 0; x < 768; x++)

  {

    showRGB(x);  // 

    delay(10);   // paus 0,001 sek

  }

}

// ShowRGB()  põhivärvid: 

// 0 = punane 

// 255 = roheline

// 511 = sinine

// 767 = jälle punane 

void showRGB(int color)

{

  int redIntensity;

  int greenIntensity;

  int blueIntensity;

  if (color <= 255)                

  {

    redIntensity = 255 - color;    // lülitakse välja punane

    greenIntensity = color;        // lülitakse sisse roheline

    blueIntensity = 0;             // sinine on välja lülitatud

  }

  else if (color <= 511)          

  {

    redIntensity = 0;                     // punane on välja lülitatud

    greenIntensity = 255 - (color - 256); 

    blueIntensity = (color - 256);        

  }

  else if (color >= 512)             

  {

    redIntensity = (color - 512);        

    greenIntensity = 0;                  

    blueIntensity = 255 - (color - 512);  

  }

  analogWrite(RED_PIN, redIntensity); // punase LED´i sujuv ümberlülitamine

  analogWrite(BLUE_PIN, blueIntensity);

  analogWrite(GREEN_PIN, greenIntensity);

}

Põhimõtteliselt toimib see nii, et see silub üleminekuid värvide vahel.

OOP

OOP-tehnikad

  • Inkapsulatsioon: Funktsionaalsus peidetakse objekti sisse, piirates otsest ligipääsu selle sisemistele detailidele.
  • Modulaarsus: Programm jagatakse sõltumatuteks mooduliteks, mis töötavad koos.
  • Polümorfism: „Mitu vormi“ – võimaldab alamklassidel muuta vanemklassi meetodite käitumist.
  • Pärilikkus: Üks klass (alamklass) saab pärida teiselt klassilt (vanemklassilt) omadusi ja meetodeid.

Sissejuhatus OOP-sse

Objektorienteeritud programmeerimises räägitakse klasside kirjeldamisest ja objektide loomisest nende kirjelduste alusel. Objektide käsitlemine toimub klassis määratletud meetodite kaudu (meetodid on põhimõtteliselt funktsioonid).


Klassid

Klass on kasutaja määratud andmestruktuur, mis seob andmeväljad (muutujad) ja meetodid ühtsesse tervikusse. Klass on nagu plaan, mille järgi saab luua piiramatult objekte.

Näide konstruktorist:

class Dog:
    # Klassikonstruktor
    def __init__(self, name):
        self.name = name


Konstruktorite tüübid Pythonis

  1. Vaikekonstruktor – kui konstruktorit ei määrata, loob Python selle automaatselt (__init__(self)).
  2. Mitteparametriseeritud konstruktor – ei võta lisaparameetreid.
  3. Parametriseeritud konstruktor – võtab vastu parameetreid ja võimaldab erinevaid algväärtusi.

Objektid

Objekt on klassi eksemplar ehk tegelik näide. See sisaldab atribuute (muutujaid) ja meetodeid.

Objekti loomise süntaks:

dog_name = Dog("Snoopy")

Objekti omadused:

  • Identiteet – igal objektil on ainulaadne ID.
  • Seisund – määratud atribuudi(te) väärtustega.
  • Käitumine – määratud meetoditega.

Pärilikkus

Omadused jaotatakse hierarhiliselt:

  • Vanemklass – sisaldab üldiseid omadusi ja võib sisaldada abstraktseid meetodeid.
  • Alamklass – pärib omadused ja laiendab neid.

Abstraktseid meetodeid ei saa kasutada enne, kui need on alamklassides implementeeritud.


Inkapsulatsioon

Inkapsulatsioon eraldab klassi sisemise toimimise selle liidesest (interface). See aitab hoida koodi stabiilsena, isegi kui sisemine toimimine muutub.

Näide inkapsulatsioonist ja privaatsetest muutujatest:

class Computer:

    def __init__(self):
        self.__sellingprice = 700  # privaatne muutuja

    def sell(self):
        print("Müügihind: {}".format(self.__sellingprice))

    def set_selling_price(self, price):
        self.__sellingprice = price

c = Computer()
c.sell()

# Püüame muuta hind otse
c.__sellingprice = 1000
c.sell()

# Muudame hind setter-meetodiga
c.set_selling_price(1000)
c.sell()

Väljund:

Müügihind: 700  
Müügihind: 700  
Müügihind: 1000

Polümorfism

Polümorfism tähendab, et sama meetod käitub erinevates klassides erinevalt.

Näide:

class Circle:

    def corners(self):
        print("Ringil pole nurki")

    def sides(self):
        print("Ringil on üks külg")

class Rectangle:

    def corners(self):
        print("Ristkülikul on neli nurka")

    def sides(self):
        print("Ristkülikul on neli külge")

# Ühine liides
def corners_test(shape):
    shape.corners()

# Objektide loomine
first_shape = Circle()
second_shape = Rectangle()

# Meetodi käivitamine
corners_test(first_shape)
corners_test(second_shape)

Väljund:

Ringil pole nurki  
Ristkülikul on neli nurka

Abstraktsioon

Abstraktsioon tähendab keskendumist olulisele ja ebaolulise peitmist. Kasutaja teab, mida funktsioon teeb, aga mitte kuidas see töötab.

Pythoni moodul abc (Abstract Base Class) võimaldab luua abstraktseid klasse.

Näide abstraktsioonist:

from abc import ABC

class Animal(ABC):

    def sleep(self):
        print("Ma lähen magama.")

    def speak(self):
        pass  # abstraktne meetod

class Human(Animal):

    def speak(self):
        print("Ma oskan rääkida.")

class Snake(Animal):

    def speak(self):
        print("Ma oskan sisiseda.")

class Dog(Animal):

    def speak(self):
        print("Ma oskan haukuda.")

class Lion(Animal):

    def speak(self):
        print("Ma oskan möirgata.")

# Objektide loomine ja meetodi kutsumine
human = Human()
human.speak()

snake = Snake()
snake.speak()

dog = Dog()
dog.speak()

lion = Lion()
lion.speak()

Väljund:

Ma oskan rääkida.  
Ma oskan sisiseda.  
Ma oskan haukuda.  
Ma oskan möirgata.